
To light up Lego bricks easily, you're advised to get a compatible led Lego lighting kit, which is specially designed for each Lego set. Then you can just install Lego lights to your Lego model by following the simple instruction to get it illuminated.
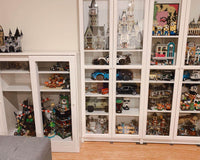
Only those enthusiasts of Lego structures can understand the thrill of assembling piece after piece in order to create a detailed Lego structure. It often takes hours, weeks, and even more when you are creating some large structures like those from Star Wars or Avengers. It takes a sheer will of completing a structure and precise skill to assemble the pieces accurately because the pieces are small in size, and when you are working with thousands of them, the task gets complicated.

Coming to light kit installation, you would definitely wish to make your Lego structure look livelier even when it is dark, and the room lights are turned off. However, those with little or zero knowledge about electrics might feel the idea daunting while the task is rather really simple.
5 Things to Keep In Mind While Installing Lights for Lego Sets
Here is how to install Lego Lighting kits properly:
Step 1: Assembling The Structure Before Adding Lights
The foremost Lego idea of lighting kit installation will be to contain your excitement about adding lights till you finish assembling all the Lego pieces properly. As the Lego structures are equipped with hundreds and thousands of tiny pieces, you are likely to lose the tiny lighting accessories among the Lego pieces if unpacked before completion of assembling.
Step 2: Check The Accessories Before InstallationNow that you have finished the installation, it is time to unpack the box and keep the accessories separately in a way they are not mixed up. Check each light, wire and other accessories to ensure everything is in proper shape and if you find any discrepancy, return the package immediately.
Step 3: Refer To The Instruction Manual Step By StepThe Lego light kits come with user guide and instruction books written in a universal language so that you have no problem in understanding the manual. You will have to refer each step mentioned on the manual to install the lighting accessories. No electrical knowledge is required as the kits are designed to plug in and play.
Step 4: Pass The Lights And Wires In Between Pieces ProperlyThe LED wires, LED lights and other accessories like expansion boards, light strips, USB cables, USB hub, etc are small-sized, and you need to be precise in passing the wires and lights between the Lego pieces. Make sure no wire or light gets tampered by passing forcibly or dangle in front of the structure to ruin the original look. The wire should run between 2 knobs beneath or between the Lego pieces without being pressed. Also, Lego set light cables should not be joined forcibly, but lay comfortably between studs and spare wires should be hidden beneath bricks.
Step 5: Turn On Power To Check Whether Lights Are FunctioningYou can add multiple Lego lighting kits with a single power source, although the power should not exceed 5V lest it would burn. Set up the AA batteries inside the box or power bank or use a USB hub and turn on the power to see if they work correctly.
Complete assembly of the structure also gives you an idea about where to put the lights and whether you can customize them. Once you have tested the accessories and powered the lights, it is time to enjoy the new look of your Lego structures.