
Do you consider yourself an experienced Lego enthusiast? If yes, would you jump at the idea of building the largest Lego structure ever? Of course, yes. You might have already guessed which set is being referred to and if not, this the Lego 10276 review. The Lego Colosseum 10276 will help you realize the dream of having an elaborate and majestic centerpiece at your home, office or workplace, just like you might have seen in many delegates’ offices or military bases from action movies.
A treat to any history buff, the oval amphitheatre of Colosseum in the heart of Rome is the largest standing, ancient amphitheatre with several brutal gladiatorial histories entwined within its bricks. Speaking on behalf of the imperial past of Italy, this structure built in 70-80 AD by Vespasian and Titus Caesar has been a victim to the ravages of robbers and earthquakes –the Lego Colosseum set just depicts its long journey through the ages.
Just as they say, “when in Rome, do as the Romas do”, it is applicable to building this enormous structure because when you have unboxed it you should do as any Lego builder will do. However, after the Lego Colosseum unboxing, you can create its dreamy night view and make it more appealing when the ambience is dark with the LED lights. Before coming to the light setup, have a look at what this educational and enchanting set has in store for you –

Knowing About The Lego Colosseum 10276 Set
If you thought that the box of the Lego Milllennium Falcon 75192 was huge and the Colosseum box will be even larger, you do not need to worry as it is about 25% smaller in size i.e. 53cm x 48 cm x 28cm in dimension or 71.2 liters. In respect to the Millennium Falcon, however, you should expect 20% extra Lego pieces. The Lego Architecture series has always set the bar high and this one just creates a new milestone with its 9036 pieces to assemble as you might need several days for getting it done. In epic proportions, once you are done assembling, the entire 360 degree visual will be mesmerizing as it stands 27cm in height, 59cm in depth and 52cm in width.
- The free-standing architectural and engineering digest is designed resembling the original elliptical structure that could hold about eighty thousand enthusiastic spectators.
- Just as the structure had no ‘bad’ seating, its Lego structure creates a similar panoramic display supported by the oval base.
- Enlighten yourself with more historical details and design process of the set with the building instruction book styled like a coffee-table booklet.
- The Lego Creator Expert 10276 Colosseum is a challenging set to build and therefore, anyone aged eighteen or above is advised to go on with the building.
- Ionic, Doric and Corinthian ordered columns along the three levels and the surviving archways will help anyone who has visited the structure to reminisce about the visit and increase interest among those who have not visited yet.
- Look out for the Corinthian pilasters decorating the attic, the authentic decoration of its northern part, the brilliant façade and the mysterious structure of the hypogeum that passes beneath the floor surface.
- The 10271 Fiat 500 from the Creator Expert series can make a great addition to the travertine road around the structure laid with paving stones and adorned with lush olive trees.
- The Lego 10276 price is set at USD 549.99 for US buyers, CAD 649.99 for Canadian buyers and GBP 449.99 for UK buyers.

Building Experience With The Lego Colosseum 10276 Set
Once you are all set to delve into the tedious building process, including the base of two identical parts, four opposite parts of the columnar pillars and about forty nearly identical sections of the arena, let’s know what each of the four boxes contains along with their assembly.
The ‘sand of the Colosseum’ as the ‘beating heart of Rome’ as depicted by the Roman senator Gracchus in the movie Gladiator is there to challenge your dedication, patience and concentration. Before that, there are a few highlights to know –
- Just like the destroyed southern wall, the Lego version consists of lesser pieces than the northern part that is more diverse without any identical Lego parts i.e. the tiles and slopes of the upper part are different for each.
- Basically, you will make 4 sections where each curve is joined with the other with small joint ball connectors throughout the walls. No 2 angles will look the same once you are done and in repeated building, you will stumble across new combinations and patterns.
The 1st Box
Through five stages, including the initial three into creating the two parts of oval base, the fourth stage into connecting them and the fifth one into creating an edge, you will get to assemble within two hours. The box contains instruction manual, four unnumbered bags and six numbered bags, one medium and two small unmarked bags.
- First Stage (30 Minutes)
Two large semicircular platforms can be connected with SNOT brackets. Ten 16x16x11/3 plates with Technic pins are included as mosaic parts to be connected with pins. While repetitive, the building process for the Colosseum bases will be quick as both the modules are identical.
- Second (10 Minutes) And Third (20 Minutes) Stages
Add the Inverted 46x2x2 bracket on each side and add the Technic module for rigidity –this will take ten minutes give and take. In third stage, you have to add a few 2x8 and 2x6 plates along the edges to add strength that results in the earth green and olive green patterns on the oval base. The two half sections now get attached for the complete oval structure.
- Fourth Stage (20-30 minutes)
Now, the base gets a solid box model on it and structural integrity is achieved by attaching the two pins while matching a vertical space between the two Technic plates and two plates between them. Although a bit difficult to insert into the small portals on either end, once you are done, the oval base becomes more solid. Add red, blue, white and yellow bricks afterwards.
- Fifth Stage (20 minutes)
About twelve wide 4-stud modules are added with SNOT techniques to give the round shape where the top section has dark stone bluish grey slopes and the rest three sections have black slopes.
The 2nd Box
There are five numbered steps with 6 to 18 numbered bags and the entire process takes about five hours with the help of the instruction manual. The manual has 6th to 9th stage for finishing up the base and hypogeum while 10th to 18th stage describes about the Colosseum assembling.
- Sixth Stage (Half an hour)
Just like the last stage, this process will go along with the additional step where you can lift the model, thanks to the sloped ends for each side. The oval base is now 59.4cm x 52.7cm in size.
- Seventh Stage (20 minutes)
You can cover the base clockwise using the smooth dark bluish grey tiles. The 6x6 decent-sized tiles are easy to install. There are also some ½ plate thick spaces on surface that will look distinct when you add lights to Lego Colosseum 10276.
- Eight (25-30 minutes) and Ninth (20 minutes) Stages
Recreate central ruins using upside-down pieces that reveal the hollow part of the pieces and resemble ruined masonry. In ninth stage you get to build the oval central ruins with modules using 1x4 hinge pieces.
- Tenth Stage (20 minutes)
Use the ½ offsets with 1x3 and 1x2 jumpers to create eastern and southern sections and fill with semicircular section.
- Eleventh to Fourteenth Stages (1.5 hour, Nearly 20 minutes for each bag)
Use wide and narrow alternative sections and attach them with ball-socket joints having 4-stud width for rear side and 3-stud width for front side. You will get the gently curved structure as the modules are snapped together.
- Fifteenth Stage (25-30 minutes)
While earlier 4 stages connected two modules, this stage has one more, making nine modules in total. The southeast quarter for the ring is now in shape. Just like you built the east and south ends, the west end should be built like that.
- Sixteenth to Eighteenth Stages (About 1 hour, Nearly 15 minutes for each bag)
For the southwest corner, you will get to build one wider and one slender module for each stage before moving on to the next box.

The 3rd Box
Around four hours of time is needed to go through the entire building process from the third box. It contains eleven stages with one instruction booklet, eleven marked and seven medium and two small unmarked bags.
- Nineteenth (20 minutes) and Twentieth (15 minutes) Stages
19th stage requires you to assemble two modules and that in 20th stage is another module, all of which are attached finally.
- Twenty-first Stage (25-30 minutes)
You will understand the full scale of the structure especially that the northern section is larger than southern just like in real. With ‘vertical exaggeration’ lets you see the model from above as you form the module building the northernmost section.
- Twenty-second to Twenty-sixth Stages (About two hours, 25 minutes for each bag)
From this stage onward, only one module is built per bag as each module will be taller, deeper and more intricate than the other section. The three Capital order decoration are built, as well as additional details like Scrolls with Rolelr Skates on Ionic Columns. Once five modules from five bags are assembled, they are attached on left side of northern pillar built in 21st stage.
- Twenty-seventh to Twenty-ninth Stages (About an hour, 15-30 minutes for each bag)
Follow the pattern of one wider and one narrower modules as you build three modules and fill any gap due to the 1-stud space in front-back connections. Here, the module in 28th stage is larger and takes significant time while the two narrower modules of 27th and 29th stage are built more easily.
The 4th Box
Just like ancient Roman scriptures, this Lego Roman Colosseum box marked as IIII instead of IV will offer you eleven stages with nine large marked bags for the northern side, two marked bags for finalizing the model, one small and eight medium-sized unmarked bags. There is also instruction manual and the entire process takes about 4.5 hours.
- Thirtieth Stage (25-30 minutes)
Along with the earlier stage, this module will help you creating the sloping edge on the left side where the tallest section of ruins of northern side of this module ends.
- Thirty-first to Thirty-fifth Stages (About 2 hours, 25-30 minutes for each bag)
Just as you do for 22nd to 26th bags, these stages also lets you create the final quadrant with five quite similar modules that will join together to result in the large assembly.
- Thirty-sixth to Thirty-eighth Stages (About 1.5 hours)
To build the eastern section of north façade, four modules are to be created. The diagonal flaring support will strengthen the structure.
- Thirty-ninth (20 minutes) and Fortieth (25-30 minutes) Stages
The 1x2x2 window sections are needed to add the additional finishing touched to the model. The front section facing the south will now get some cars in cool bright yellow scheme and trees in olive-green scheme. Another removable module covering eastern side of floor is to create mystery about the hypogeum.
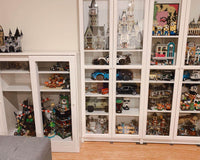
Lighting Kit To Make The Colosseum Look Stunning
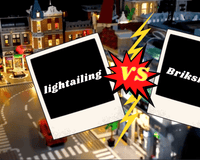
Even though you do not have proper electrical skills, the light kits for Lego Colosseum 10276 can be easily plugged and played, thanks to Lightailing and Briksmax for making these kits age-appropriate for anyone above six years of age. The Lego Colosseum light set includes green high-quality LEDs to brighten up the base and travertine path laden with olive trees while the white and warm white premium LEDs will highlight the interior and exterior walls, the minute windows, pillars and the hypogeum.
Each light kit contains universal manual with illustrated guidance just like the Lego set and there are peripheral accessories like connecting cables, expansion boards, Adhesive Squares, USB cable and AA battery holder, for which AA batteries are to be bought separately. As the building process is quite strenuous, test each light kit elements properly before the installation.